The Best and Easiest Cherry English Scones Recipe
The Best and Easiest Cherry English Scones Recipe starts with simple ingredients, but creates the perfect cherry scone recipe!

If you’re hosting Afternoon Tea, you’ve got to have a plate full of flaky scones, and these homemade cherry scones will have everyone giving a star rating!
You will love this post if you’re a fan of biscuits, and you’re wanting to try your hand at making British scones.
The best part about this recipe is the scone dough can be transformed into any flavor you’d like! So, if tart cherries aren’t your thing, you can read a few variations, or try your own at home.
This post contains affiliate links.
The Best and Easiest Cherry English Scones Recipe
First, let’s gather the ingredients you’ll need.
This recipe uses self-rising flour. I like to keep self-rising flour in my pantry for The Best Homemade Biscuits you’ll ever make, and this scone recipe isn’t too far off from it.
Self-rising flour has a leavening agent in the flour as well as salt. You might notice in the recipe card there is no salt listed in the ingredients, and that’s because the self-rising flour already has the salt and baking powder! One less step for you! Yay.

Scones are very similar to American biscuits with the addition of an egg.
So, with that, you’ll need an egg! I prefer using extra-large eggs.
You’ll mix the egg with some heavy cream, this helps make that tender crumb in a scone. You could also use sour cream if you don’t have whipping cream!
You’ll also need cold butter. My preferred method for the butter, instead of using a pastry blender, is to grate a frozen stick of butter into the flour mixture. The shreds of butter create the flaky layers you want in a biscuit or scone! And, since you’re not cutting the butter in, it stays nice and cold.
Next, you’ll need extra baking powder, a little sugar, and the cherries!
The extra baking powder is for the added lift you want when making scones. You want them to lift high and mighty!
Last fall, Paradise Fruit Company sent me a box of goodies to try my hand at using. As soon as I saw the red and green cherries, I wanted to make Christmas scones.
Tips for Making Delicious Scones
Your butter, cream, and egg should be very very cold.
For fresh scones, you want to manhandle them as little as possible! I recently purchased a Dutch Dough Hook, and my biscuits and scones are much more tender! Crazy how that is!
You could also use a pastry cutter like this one.
Get out a large bowl! I love using my Mason Cash Bowl!
Grate your butter into your dry ingredient, then use the dough hook to lightly toss everything around, dispersing the butter into the flour to resemble coarse crumbs.
In a measuring cup, mix together the egg and heavy cream, then pour them into the center of the flour and butter.
Using your dough hook, gently start stirring from the center of the liquid, and out to the sides where the dry ingredients are.
Lightly mix it all about until it starts to come together. It should look like a very shaggy dough. Add in your candied cherries (or dried cherries, fresh cherries that have been pitted, etc!), and continue lightly mixing until they are evenly distributed.

Dump this out onto a floured surface, and begin patting together until a dough forms. If it seems too dry, drizzle a little extra heavy cream in. This will depend on your area, and how dry your climate is. Some days I add more cream, other days it’s just fine.
Baking this Cherry Scones Recipe
When your scone has formed into a dough, give a good “lamination.”
This means, rolling it out about an inch thick with a rolling pin (or using your hands to press it out as I did in the video!), folding the bottom half to the middle, and the top half over the bottom half. Or! You could cut it into four sections, stack them on top, and press down, roll it out again. Do this a few times.
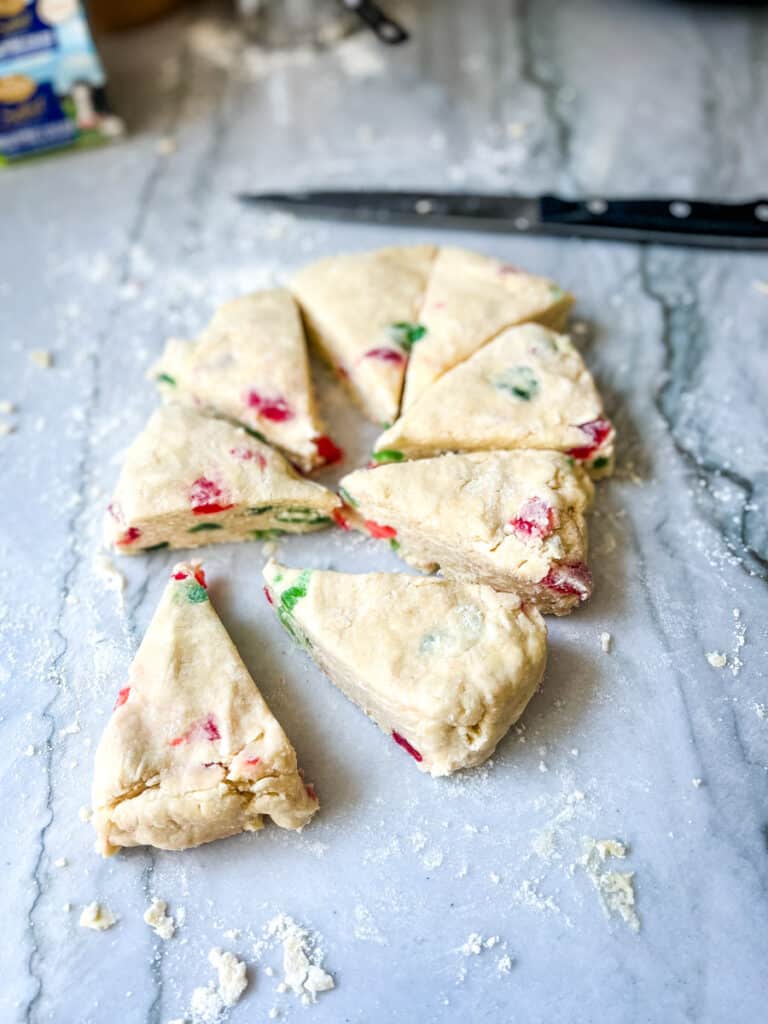
Then, just press out into a circle, then using a sharp knife cut into eights.
American scones are triangles, and British or Irish scones are ones cut using a round cutter. However you want your scones shaped, cut them that way!
Place scones out on a baking sheet pan, and brush whipping cream over the top of each one. I use the remnants of the measuring jar with the egg and cream!

Place the cookie sheet back in the refrigerator for 20 minutes before you bake them. You want cold scones hitting a hot oven to get the optimum flake and crumb!
Bake the sweet scones until golden brown, about 20-25 minutes depending on how many you have on your sheet tray, and how close together they are.
Usually, when I bake something that needs to rise, like biscuits or scones, I like to place them next to each other! Just like friends help friends rise up, biscuits and scones need each other to rise as well. They help lift each other up.
But, if your dough is an inch thick, it’ll be just fine separated out on the baking tray.
Once they’re baked, remove them from the oven and let them cool on a wire rack.
Serving Scrumptious Cherry English Scones
I like to serve my scones with room-temperature butter, cream cheese, or double cream from Double Devon. It’s the American version of clotted cream! If you’re in the UK, you know a scoop of clotted cream is unparalleled with fresh cherry scones.
Store any leftover scones in an airtight container, on the counter for up to 5 days.

Buttery Scone Additions
If you’re not a fan of cherries, use this same recipe but omit the cherries.
Instead, use chocolate chips, lemon zest, orange zest, or any dried fruit you like, or leave it plain! You can also add vanilla extract, almond flavor, or a teaspoon of almond extract to really pump up the flavor of your scones! Yum.
Frequently Asked Questions:
What is the secret to making good scones?
You want to form as little gluten as possible. Overmixing can form the gluten too much, creating a tough scone.
How do I get my fruit scones to rise and be fluffy?
If you’re adding fruit to your scones, give them a light toss with some all-purpose flour. That way the flour-coated fruit can “grab on to” the butter and flour scone mixture. This will help the fruit not to sink, and allow the scone to rise and be fluffy! Yay!
Should you use eggs in your scones?
Yes! You should. This helps bind everything together and creates a more rich flavor.
Should I let the scone dough rest?
Yes! Allowing the scone dough to rest before baking does two things: it helps relax the gluten, creating a tender, flaky scone. And! It chills the butter so when the butter hits the hot oven it releases the steam and creates the fluffy, flaky layers we all know and love.
Save this to your favorite baking board on Pinterest!


The Best and Easiest Cherry English Scones Recipe
- Prep Time: 20
- Cook Time: 25
- Total Time: 45 minutes
- Yield: 8 1x
- Category: breakfast
- Method: oven-baked
- Cuisine: british
Ingredients
- 2 cups Self-Rising Flour
- 1 TBS Baking Powder
- 1/2 cup Sugar
- 1 stick Cold Butter, grated
- 1/2 cup Heavy Cream
- 1 extra large Egg
- 2/3 cup Candied Cherries
Instructions
- In a large mixing bowl, whisk together 2 cups of self-rising flour, one tablespoon of baking powder, and half a cup of sugar until evenly combined.
- Grate one stick of frozen butter into the flour mixture, fluff around until coated and evenly distributed.
- In a measuring cup, whisk together half a cup of heavy cream and one extra large egg.
- Pour this into the center of your flour mixture, and using a light hand or dough hook, bring it together until it forms a shaggy dough.
- Add in your 2/3 cup of candied cherries, and mix those in to evenly distribute.
- Turn your dough out on to a lightly floured surface, and work together until a dough forms. If you need to add a drizzle of heavy cream do so now, starting with one tablespoon at a time.
- Press out or roll out using a rolling pin to one inch thick. Laminate using the envelope method, or slice into four sections, stack on top, and press out.
- Do this laminate three times to achieve optimal layers.
- Shape your laminated dough into a circle and cut it into triangles.
- Place the triangles on a sheet pan, you can line it with parchment paper if you want to! And allow to chill in the fridge for 20 minutes before baking.
- Preheat your oven to 400˚.
- After the scones have chilled for 20 minutes, brush the top of each scone with the remaining egg and cream mixture from the measuring cup. Adding a tablespoon of cream if necessary!
- Bake at 400˚ for 20-25 minutes, or until golden brown on the bottom edges, and slightly brown on top.
- Remove from the oven and cool over a wire rack.
- Serve with butter, double cream, or anything you like on your scone!
Equipment
Notes
You can freeze unbaked scones, and bake a few when you need them! Just freeze on parchment paper, about an inch apart. Once fully frozen remove, and store in a freezer-safe ziptop bag. The baking time will increase by close to 10 minutes.